1. Download firmware 3.41 HERE first and save it to your desktop
2. Now Connect the USB Storage Device to your computer and quick format the USB Drive
[ Make Sure you format your USB Drive As Fat32 or else the ps3 wont recognize your pen drive]
3. After formatting the drive open the drive and create a folder called PS3 ( the name of the folder should be in caps )
4. Create another folder inside PS3 folder named UPDATE ( the name of the folder should be in caps again )
5. Copy the downloaded file named PS3UPDAT.PUP inside UPDATE folder on your USB Storage Device
6. That’s it now connect your drive to your ps3.
Updating PS3 Firmware With USB Drive
_______________________________________________
1. Turn on the PS3 and connect your USB Drive which have the PS3 update in it
2. In the overhead menu go over to Settings and then to System Update, Press X on your controller to move to the next step.
3. Now select to update via storage media ( as shown in the image below )
Follow the screen instructions after that to complete the update,
__________________________________________________ ______________
note : your ps3 must be below 3.41 to make this work .
10.12.10
N900 JailBreak Playstation 3 Easy Tutorial
This is great news for those who have a PS3 and a Nokia N900. you can now easily jailbreak your PS3 whit the N900 and play all the backup games in the PS3.

Here is the easy tutorial:
NOTE: THIS ONLY WORKS FOR PS3 FIRMWARE 3.41.
1- If you dont have it already you have to enable the Extra-devel repositories in your N900. go HERE to see how.
2- After you have the extra-devel repositories enabled go to the app manager and download and install the PSFREEDOM program in your N900.
3- Format a pendrive in fat32 in your PC.
4- download HERE the Gaia manager program and HERE the GAIA GAMEZ, then copy both files to the root of your pendrive. (out of any folder).
5- insert any game inside the ps3, then turn off the power of the ps3 and remove the powercable. dont conect yet the pendrive.

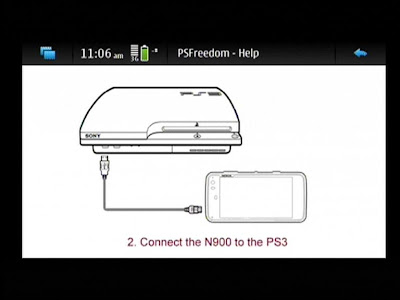
6- Conect the N900 to the PS3 usb then open the PSFREEDOM program in the N900 and select the option "JAILBREAK MODE ON PL3 MODULES"

7- now connect the powercable to the PS3, and push the power button and imediatly push the eject button. (you have to do this kwickly).
 How do you know you did it fast enough?
You won’t hear 2 beeps when you first hit the eject button. I prefer using both my hands.
Nothing will seem to be happening. That’s fine. The n900 will show the Storage or PC Suite window. Then a warning about insufficient power.
The N900 light should be red and then should became Green.

How do you know it worked?
On the ps3, there should be a new option, under Game called: Install Packages.
8- Now insert the pendrive in the usb.
9-Open the folder INSTALL PACKAGE (under Game) and install the GAIA MANAGER and next install the GAIA GAMEZ, if youre prompted to overwrite select yes.
10- Thats it. now you have your PS3 ready for reading backup games and to do your backups from BD games. just need to open the folder GAIA MANAGER and follow the options. (see the tutorials for using gaia manager, this tutorial is only for PS3 JAILBREAK).
Tested and Working 100%
Have Fun
Give thanks to the Maker KaKaRoto:
kakaroto.homelinux.net
please Commment
Here is the easy tutorial:
NOTE: THIS ONLY WORKS FOR PS3 FIRMWARE 3.41.
1- If you dont have it already you have to enable the Extra-devel repositories in your N900. go HERE to see how.
2- After you have the extra-devel repositories enabled go to the app manager and download and install the PSFREEDOM program in your N900.
3- Format a pendrive in fat32 in your PC.
4- download HERE the Gaia manager program and HERE the GAIA GAMEZ, then copy both files to the root of your pendrive. (out of any folder).
5- insert any game inside the ps3, then turn off the power of the ps3 and remove the powercable. dont conect yet the pendrive.

6- Conect the N900 to the PS3 usb then open the PSFREEDOM program in the N900 and select the option "JAILBREAK MODE ON PL3 MODULES"


You won’t hear 2 beeps when you first hit the eject button. I prefer using both my hands.
Nothing will seem to be happening. That’s fine. The n900 will show the Storage or PC Suite window. Then a warning about insufficient power.
The N900 light should be red and then should became Green.

How do you know it worked?
On the ps3, there should be a new option, under Game called: Install Packages.
8- Now insert the pendrive in the usb.
9-Open the folder INSTALL PACKAGE (under Game) and install the GAIA MANAGER and next install the GAIA GAMEZ, if youre prompted to overwrite select yes.
10- Thats it. now you have your PS3 ready for reading backup games and to do your backups from BD games. just need to open the folder GAIA MANAGER and follow the options. (see the tutorials for using gaia manager, this tutorial is only for PS3 JAILBREAK).
Tested and Working 100%
Have Fun
Give thanks to the Maker KaKaRoto:
kakaroto.homelinux.net
please Commment
5.12.10
WARZONE 2100 for N900 Easy Tutorial

Gameplay
The game is fully 3D, based on the iViS games and 3D graphics engine developed by Sam Kerbeck of Eidos. The terrain is mapped by a grid; vehicles tilt to meet hilly terrain, and projectiles can be realistically blocked by steep mountains. The camera is free-moving and can zoom in and out, rotate, and pan up or down while navigating the battlefield.
In the game, units of different factions are painted different colors. The New Paradigm, the Collective, and Nexus are the enemies of the Project in the campaign, and they can be seen attacking Project forces as well as Scavengers, survivors of the nuclear fallout.
Units can all be customized according to: chassis (which, for example, takes weight and power into account); drive system (such as wheels or tracks); and mounted object (such as a weapon, or one of various support tools). Units can level up from ranks such as Rookie to Trained and Professional.
Warzone 2100 places an emphasis on sensors and radar to detect units and to coordinate ground attacks. Counter-battery sensors detect enemy artillery by sensing their projectiles and firing arcs and pinpointing their location to coordinate artillery strikes against enemy artillery. There is an emphasis on artillery: although many direct- and close-combat weapons and anti-air weapons can be researched and deployed, artillery is a staple of assault on enemy bases and outposts. While the technology tree is clearly defined and consistent, it never appears in-game and, therefore, the player can be left guessing as to what technology is next in the tree. Technology can be acquired by gathering artifacts left behind by certain destroyed enemy structures or units. Researching is composed of largely small and incremental advancements over existing weapons, armor, and chassis types.
All of the terrain throughout the campaign is essentially composed of three areas, with different sectors for Away missions and other such levels; upon progression, previous maps simply expand and the player's original bases from past levels are maintained. Also, its resource system is quite different from mainstream RTS games; Oil Derricks are established over specific, scarce locations which constantly provide a slow, fixed rate of income. Combined with a mission time limit, this resource method makes it generally infeasible for players to utilize certain traditional RTS tactics such as "turtling" (fortifying one or more bases against enemy attack, while stockpiling resources with which to produce a massive army).


This is a spetacular game and now you can have it in your N900.
Since the game its not available in any of the Repositories its a litlle tricky to intall it and all the process have to be done by command line in the x-terminal, so i find better to give you a video tutorial of all the steps to be done so you can follow visually and not make any mistakes.
I Personaly guarantee that this game is one of the best games you can have in your N900 if you like strategy games. its fully 3d. This is a port of the original game from PC and althougt the game runs full speed there is no sound suport for now.
Since this is a port from PC game ill give you the PC game two in case you want to test it first on your PC or simply have it in both platforms.
I hope you enjoy this game as much as i do.
Please comment
WARZONE 2100 PC GAME DOWNLOAD HERE
WARZONE 2100 N900 INSTALLATION VIDEO TUTORIAL DOWNLOAD HERE
HAVE FUN
4.12.10
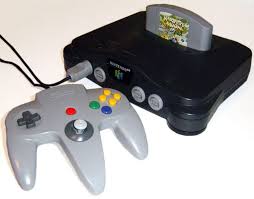
NINTENDO 64 EMULATOR tutorial

Its fully possible to play Nintendo 64 games whit the N900 at full Speed.
Althought the games run alright in the "normal" N900, for better results i recommend to overclock the N900 to 900Mhz HERE


TUTORIAL:
1- Download the Game Paks provided in the end of this post and unzip the files.
2- Connect the N900 to the PC and choose the mass memory connection.
3- Place the unzipped folder whit the games in the N900 mass memory or in the MMC. You can choose the place where you want them because you just have to choose the path where the games are in the emulator Muphen64plus.
4-Disconnect the N900 from the PC.
5- Now you have to go to the app manager and download and install the Mupen64plus avalable from the repositories Extra-Devel. if you dont have this repositories activated follow this tutorial.
After you downloaded and installed the Mupen64Plus you should see this icon:

6- Open the Mupen64plus and choose OPTIONS:

7- Select Configure:


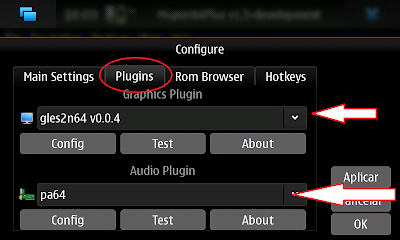
9- Next select the Plugins, and select exactly like on this image:
On the graphics Plugin select glesn64 v0.0.4 and on the Audio Plugin select pa64. Click on "APPLY"
10- Go to the Rom Browser and select ADD, then you just choose the path where the folder of the games you previously placed are and click APPLY.

11-click options again.

12-select "input settings"

13-Map the keys the way you like just selecting each button and click the key you would like to remap for that button. in the end click on "OK". note that on for the left/right and up/donw you have to remap whit the x and y axis.

Thats it!! now you are fully configured to play Nintendo 64 games at full speed.
To Play the Games:
1- All the games that you have on the folder you gave the path should appear on the main screen of the emulator. you just have to select the game you want and click on the "play" icon like you see on the image.

To Stop the games you have to minimize the game whit CTRL + BACKSPACE, then go to the main screen of the emulator and press the "stop" icon. (near the "play" icon).
Note: Some of the games are not supported or compatible whit the emulator for now. maybe in the future all of them will be supported. I tested the game paks and most of them run smoothly but some of them just dont run and in some cases its even necessary to take out the battery to turn the device off.
HERE ARE THE GAME PAKS OF NINTENDO 64 WHIT ALMOST ALL THE GAMES FROM N64.
HAVE FUN


GAMEPAK 7 - DOWNLOAD HERE
Have Fun. Please comment.. thanks
2.12.10
NFL 2010 - WebOs Gaming easy tutorial
WebOs Games easy instalation tuturial:
NFL 2010


Easy Instalation Tutorial:
1- Donload Here WebOs NFL 2010 game.
2- conect the N900 to the PC and choose the mass memory.
3- Copy the nfl.deb that you have dowloaded to the root of the N900. (just open the N900 mass memory and copy there out of any folder).
4- Disconect the N900 from the PC.
5- If you dont have it already instal rootsh from the repositories. if you have it already go to step 6.
6- If you have already installed the Preenv app go to step 7 now. If you dont have it already install the Preenv app. open the x-term and insert the following commands:
sudo gainroot
apt-get install preenv
-It’ll ask you if you wish to continue (Y/n) type Y and hit ENTER;
7- open the x-term and insert the following commands:
sudo gainroot
preenv
cd MyDocs
dpkg -i nfl.deb
8- exit the x-term and reboot your n900.
Thats it! You have now installed the full version of NFL 2010 game in your N900
Have Fun
To Uninstall it just remove in the app manager just like you woukd remove any other app.
See the other WebOs games tutorials
Please coment
NFL 2010

Easy Instalation Tutorial:
1- Donload Here WebOs NFL 2010 game.
2- conect the N900 to the PC and choose the mass memory.
3- Copy the nfl.deb that you have dowloaded to the root of the N900. (just open the N900 mass memory and copy there out of any folder).
4- Disconect the N900 from the PC.
5- If you dont have it already instal rootsh from the repositories. if you have it already go to step 6.
6- If you have already installed the Preenv app go to step 7 now. If you dont have it already install the Preenv app. open the x-term and insert the following commands:
sudo gainroot
apt-get install preenv
-It’ll ask you if you wish to continue (Y/n) type Y and hit ENTER;
7- open the x-term and insert the following commands:
sudo gainroot
preenv
cd MyDocs
dpkg -i nfl.deb
8- exit the x-term and reboot your n900.
Thats it! You have now installed the full version of NFL 2010 game in your N900
Have Fun
To Uninstall it just remove in the app manager just like you woukd remove any other app.
See the other WebOs games tutorials
Please coment
BLADES OF FURY
WebOs Games easy instalation tuturial:
BLADES OF FURY


Easy Instalation Tutorial:
1- Download Here the WebOs BLADES OF FURY game.
2- conect the N900 to the PC and choose the mass memory.
3- Copy the blades.deb that you have dowloaded to the root of the N900. (just open the N900 mass memory and copy there out of any folder).
4- Disconect the N900 from the PC.
5- If you dont have it already instal rootsh from the repositories. if you have it already go to step 6.
6- If you have already installed the Preenv app go to step 7 now. If you dont have it already install the Preenv app. open the x-term and insert the following commands:
sudo gainroot
apt-get install preenv
-It’ll ask you if you wish to continue (Y/n) type Y and hit ENTER;
7- open the x-term and insert the following commands:
sudo gainroot
preenv
cd MyDocs
dpkg -i blades.deb
8- exit the x-term and reboot your n900.
Thats it! You have now installed the full version of BLADES OF FURY game in your N900
Have Fun
To Uninstall it just remove in the app manager just like you woukd remove any other app.
See the other WebOs games tutorials
Please coment
BLADES OF FURY


Easy Instalation Tutorial:
1- Download Here the WebOs BLADES OF FURY game.
2- conect the N900 to the PC and choose the mass memory.
3- Copy the blades.deb that you have dowloaded to the root of the N900. (just open the N900 mass memory and copy there out of any folder).
4- Disconect the N900 from the PC.
5- If you dont have it already instal rootsh from the repositories. if you have it already go to step 6.
6- If you have already installed the Preenv app go to step 7 now. If you dont have it already install the Preenv app. open the x-term and insert the following commands:
sudo gainroot
apt-get install preenv
-It’ll ask you if you wish to continue (Y/n) type Y and hit ENTER;
7- open the x-term and insert the following commands:
sudo gainroot
preenv
cd MyDocs
dpkg -i blades.deb
8- exit the x-term and reboot your n900.
Thats it! You have now installed the full version of BLADES OF FURY game in your N900
Have Fun
To Uninstall it just remove in the app manager just like you woukd remove any other app.
See the other WebOs games tutorials
Please coment
ANGRY BIRDS (WHIT ALL 3 LEVEL PACKS)
Games easy instalation tuturial:
ANGRY BIRDS


Easy Instalation Tutorial:
1- Download Here the WebOs ANGRY BIRDS game.
2- conect the N900 to the PC and choose the mass memory.
3- Copy the angrybirds.deb that you have dowloaded to the root of the N900. (just open the N900 mass memory and copy there out of any folder).
4- Disconect the N900 from the PC.
5- If you dont have it already instal rootsh from the repositories. if you have it already go to step 6.
6- If you have already installed the Preenv app go to step 7 now. If you dont have it already install the Preenv app. open the x-term and insert the following commands:
sudo gainroot
apt-get install preenv
-It’ll ask you if you wish to continue (Y/n) type Y and hit ENTER;
7- open the x-term and insert the following commands:
sudo gainroot
preenv
cd MyDocs
dpkg -i angrybirds.deb
TO INSTALL THE LEVEL PACKS:
LEVEL PACK 1 DOWNLOAD HERE - in the x-term just tipo dpkg -i angrybirdslevelpack1.deb
LEVEL PACK 2 DOWNLOAD HERE - in the x-term just tipo dpkg -i angrybirdslevelpack2.deb
LEVEL PACK 3 DOWNLOAD HERE - in the x-term just tipo dpkg -i angrybirdslevelpack3.deb
8- exit the x-term and reboot your n900.
Thats it! You have now installed the full version of ANGRY BIRDS game in your N900
Have Fun
To Uninstall it just remove in the app manager just like you woukd remove any other app.
See the other WebOs games tutorials
Please coment
TETRIS
WebOs Games easy instalation tuturial:
TETRIS

Easy Instalation Tutorial:
1- Download Here the WebOs TETRIS game.
2- conect the N900 to the PC and choose the mass memory.
3- Copy the tetris.deb that you have dowloaded to the root of the N900. (just open the N900 mass memory and copy there out of any folder).
4- Disconect the N900 from the PC.
5- If you dont have it already instal rootsh from the repositories. if you have it already go to step 6.
6- If you have already installed the Preenv app go to step 7 now. If you dont have it already install the Preenv app. open the x-term and insert the following commands:
sudo gainroot
apt-get install preenv
-It’ll ask you if you wish to continue (Y/n) type Y and hit ENTER;
7- open the x-term and insert the following commands:
sudo gainroot
preenv
cd MyDocs
dpkg -i tetris.deb
8- exit the x-term and reboot your n900.
Thats it! You have now installed the full version of TETRIS game in your N900
Have Fun
To Uninstall it just remove in the app manager just like you woukd remove any other app.
See the other WebOs games tutorials
Please coment
TETRIS

1- Download Here the WebOs TETRIS game.
2- conect the N900 to the PC and choose the mass memory.
3- Copy the tetris.deb that you have dowloaded to the root of the N900. (just open the N900 mass memory and copy there out of any folder).
4- Disconect the N900 from the PC.
5- If you dont have it already instal rootsh from the repositories. if you have it already go to step 6.
6- If you have already installed the Preenv app go to step 7 now. If you dont have it already install the Preenv app. open the x-term and insert the following commands:
sudo gainroot
apt-get install preenv
-It’ll ask you if you wish to continue (Y/n) type Y and hit ENTER;
7- open the x-term and insert the following commands:
sudo gainroot
preenv
cd MyDocs
dpkg -i tetris.deb
8- exit the x-term and reboot your n900.
Thats it! You have now installed the full version of TETRIS game in your N900
Have Fun
To Uninstall it just remove in the app manager just like you woukd remove any other app.
See the other WebOs games tutorials
Please coment
KROLL
WebOs Games easy instalation tuturial:
KROLL


Easy Instalation Tutorial:
1- Download Here the WebOs KROLL game.
2- conect the N900 to the PC and choose the mass memory.
3- Copy the kroll.deb that you have dowloaded to the root of the N900. (just open the N900 mass memory and copy there out of any folder).
4- Disconect the N900 from the PC.
5- If you dont have it already instal rootsh from the repositories. if you have it already go to step 6.
6- If you have already installed the Preenv app go to step 7 now. If you dont have it already install the Preenv app. open the x-term and insert the following commands:
sudo gainroot
apt-get install preenv
-It’ll ask you if you wish to continue (Y/n) type Y and hit ENTER;
7- open the x-term and insert the following commands:
sudo gainroot
preenv
cd MyDocs
dpkg -i kroll.deb
8- exit the x-term and reboot your n900.
Thats it! You have now installed the full version of KROLL game in your N900
Have Fun
To Uninstall it just remove in the app manager just like you woukd remove any other app.
See the other WebOs games tutorials
Please coment
KROLL
Easy Instalation Tutorial:
1- Download Here the WebOs KROLL game.
2- conect the N900 to the PC and choose the mass memory.
3- Copy the kroll.deb that you have dowloaded to the root of the N900. (just open the N900 mass memory and copy there out of any folder).
4- Disconect the N900 from the PC.
5- If you dont have it already instal rootsh from the repositories. if you have it already go to step 6.
6- If you have already installed the Preenv app go to step 7 now. If you dont have it already install the Preenv app. open the x-term and insert the following commands:
sudo gainroot
apt-get install preenv
-It’ll ask you if you wish to continue (Y/n) type Y and hit ENTER;
7- open the x-term and insert the following commands:
sudo gainroot
preenv
cd MyDocs
dpkg -i kroll.deb
8- exit the x-term and reboot your n900.
Thats it! You have now installed the full version of KROLL game in your N900
Have Fun
To Uninstall it just remove in the app manager just like you woukd remove any other app.
See the other WebOs games tutorials
Please coment
MONOPOLY
WebOs Games easy instalation tuturial:
MONOPOLY


Easy Instalation Tutorial:
1- Download Here the WebOs MONOPOLY game.
2- conect the N900 to the PC and choose the mass memory.
3- Copy the monopoly.deb that you have dowloaded to the root of the N900. (just open the N900 mass memory and copy there out of any folder).
4- Disconect the N900 from the PC.
5- If you dont have it already instal rootsh from the repositories. if you have it already go to step 6.
6- If you have already installed the Preenv app go to step 7 now. If you dont have it already install the Preenv app. open the x-term and insert the following commands:
sudo gainroot
apt-get install preenv
-It’ll ask you if you wish to continue (Y/n) type Y and hit ENTER;
7- open the x-term and insert the following commands:
sudo gainroot
preenv
cd MyDocs
dpkg -i monopoly.deb
8- exit the x-term and reboot your n900.
Thats it! You have now installed the full version of MONOPOLY game in your N900
Have Fun
To Uninstall it just remove in the app manager just like you woukd remove any other app.
See the other WebOs games tutorials
Please coment
MONOPOLY


Easy Instalation Tutorial:
1- Download Here the WebOs MONOPOLY game.
2- conect the N900 to the PC and choose the mass memory.
3- Copy the monopoly.deb that you have dowloaded to the root of the N900. (just open the N900 mass memory and copy there out of any folder).
4- Disconect the N900 from the PC.
5- If you dont have it already instal rootsh from the repositories. if you have it already go to step 6.
6- If you have already installed the Preenv app go to step 7 now. If you dont have it already install the Preenv app. open the x-term and insert the following commands:
sudo gainroot
apt-get install preenv
-It’ll ask you if you wish to continue (Y/n) type Y and hit ENTER;
7- open the x-term and insert the following commands:
sudo gainroot
preenv
cd MyDocs
dpkg -i monopoly.deb
8- exit the x-term and reboot your n900.
Thats it! You have now installed the full version of MONOPOLY game in your N900
Have Fun
To Uninstall it just remove in the app manager just like you woukd remove any other app.
See the other WebOs games tutorials
Please coment
Subscrever:
Mensagens (Atom)